Vision Portfolio Management Application Analyst Tools
Overview
Two add-ins have been defined that enable an analyst to dynamically interact with Vision from within the ExcelTM environment. The Extract add-in provides the ability to download data from Vision directly into your spreadsheet. If you have installed it, the choice Vision will appear in the menu bar at the top of your Excel spreadsheet. The VUpload add-in provides the ability to upload data to Vision directly from your spreadsheet. If you have installed it, the choice VUpload will appear in the menu bar to the right of the Vision choice. If you do not see a choice, you will need to install the add-in.
The first time you select an option from the Vision or VUpload menu, you will be prompted for a password. If you prefer, you can explicitly log in using the Connect choice in the Vision menu. You should supply your password for the VisionServer machine and click OK. You will need to provide the password whenever you restart Excel and after you disconnect from Vision (using the Disconnect choice in the Vision menu).
Uploading Data
The VUpload component allows you to temporarily make private modifications to the database using the available data feed formats. You can use VUpload to modify existing data, create new instances, and define new structures including new data feed formats. Several data feeds are also available for controlling display aspects of the applications you view through your browser. When you exit Excel, your changes to the database are not saved. If you save your changes as one or more delimited text files, they can be committed to the database permanently by the Vision Administrator using the Vision Administrator Module.
All loads are done by selecting a predefined feed name associated with the type of data you wish to upload. For example, if you want to load Company data, you use the feed named CompanyMaster. The feed can be selected via a menu or included as part of a range of data to upload.
When you have a small amount of data that is missing or needs to be updated, you can define it in a range and upload it. In this example, the Companies Comp1, Comp2, and Comp3 are missing from a database.
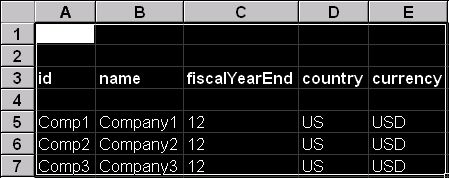
After selecting the range, it is loaded into the database by doing the following:
1. Select Upload Data From the VUpload menu.
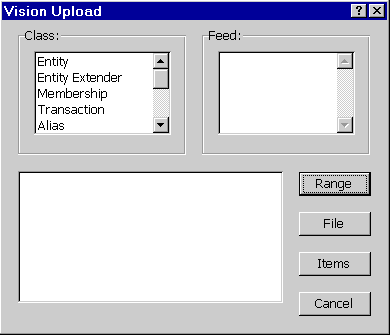
- The following dialog box appears.
-
The Class: list box display the categories. Each category contains one or more feed names.
2. Select the class Entity from the Category list box. The list of available Entity feeds is displayed in the list box on the right.
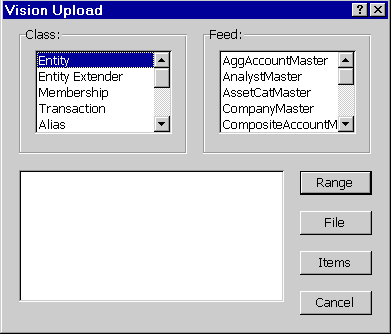
3. Select CompanyMaster from the Feed list box.
- A description of the feed appears in the display area.
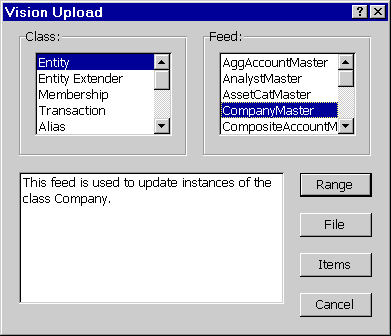
4. Select the Range button.
-
The following dialog box appears.
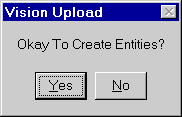
5. Select Yes to indicate that it is okay to create new entities.
-
The Diagnostics dialog box appears.
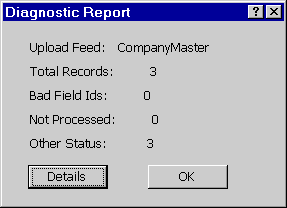
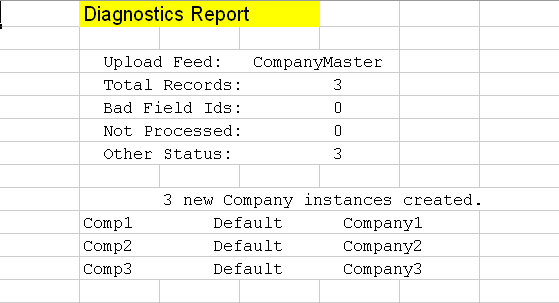
You have successfully loaded the new companies into your database. If you wanted to see the entire Diagnostics report, you can select Details and the sheet name "Diagnostics" will display the following data:
If you type the feed name above the first cell of the range, you can load the same data without needing to pick the feed from the interface. Using the companies Comp1,Comp2, and Comp3 from the previous example, the feed is set up as follows:
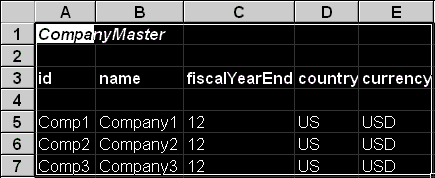
Make sure the feed name is included as the top left cell in the range. Do the following:
1. Select UploadData from the VUpload Menu.
- You should see the Diagnostics Dialog Box
2. Select OK. You have now successfully loaded the data.
Note:If you want to use the interface to upload data, the cursor cannot be in a cell that has the name of a feed.
Finding DataFeed Items
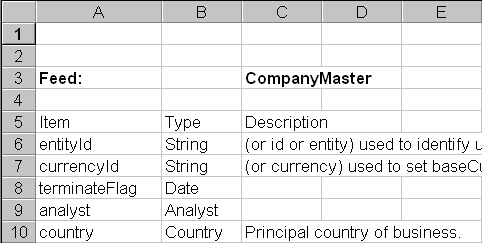
The first line of your range defines the names of the items to load. If you do not know the items for a specific feed, you can use the Items button on the interface to find them. They will then be displayed on the sheet named "Item". To use this process to find the items for CompanyMaster, do the following:
1. Select Upload Data from the VUpload menu.
2. Select Entity.
3. Select CompanyMaster.
4. Select The Items Button.
-
You should see the items defined for CompanyMaster as shown below.
Sample Usage
Vision data feeds provide a potent means for an analyst that wants to use the Vision browser applications on dynamically generated information. For example, an analyst may want to create a composite account on the fly that can be used as a benchmark for comparison with an existing portfolio. You can use the CompositeAccountMaster feed to define CompositeAccount instances and the CompositeAccountMembers feed to update the composition of CompositeAccounts over time. You can then run the Account Comparison or the Characteristics application from the browser to compare these newly created composites with other portfolios.
Creating Composite Accounts
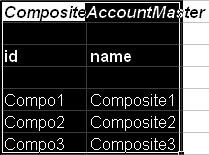
To create instances for the CompositeAccount feed, the minimal headings that are required are id and name. In this example, the instances Compo1, Compo2, and Compo3 are defined.
1. Select the range.
2. Select Upload Data from the menu.
The diagnostics report should confirm that you have successfully loaded the data.
You have now successfully created 3 instances of the class CompositeAccount.
Creating Compostite Account Memberships
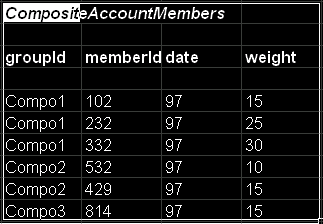
To create a CompositeAccountMemberbership, you must supply one or more accounts(memberId) and weights for each composite (groupId) Optionally, you can include date as well.
1. Select the Range.
2. Select Upload.
The diagnostics message box should indicate that you have created the instances that make this relationship correspond to each other.
Running Composite Account Reports From the Browser
To see these newly created composites from the browser, do the following:
1. Select Account Reports.
2. Select the Account Comparison Report.
3. Enter Compo1 in the Account text box, and 102 in the VS text box.
4. Select the Submit button
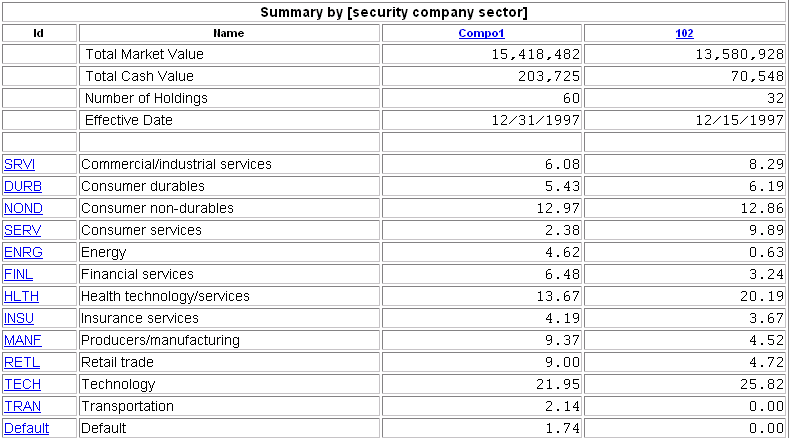
You should see the following output, comparing CompositeAccount Compo1 to portfolio 102 broken down by sector.
Using the Sample Workbook
The Sample Upload Workbook is an Excel Workbook that contains examples of all of the feeds that are available from Vision. It is located in the {fill in the blank}/Samples directory, and is called VUSample.xls.
The first Worksheet is the Table Of Contents. The TOC identifies all of the feeds on the sheets, and categorizes each feed. This is an example of the feeds belonging to the category Company.
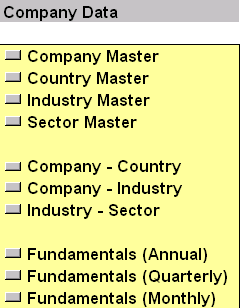
The button next to each feed name sends you to the worksheet with the corresponding feed name.
Each feed that is displayed in the worksheet is there to guide you when you set up your own feeds. This is an example of the CompanyMaster feed.
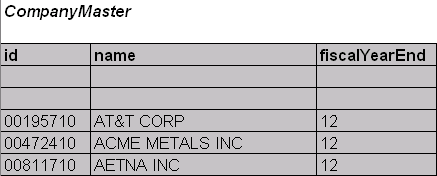
You can insert your own data, select the range, and upload it using the technique described above.
Loading Data From A Text File
Loading data from a text file that is stored in a PC directory should be used when you have a large amount of data to load. When the file is loaded this way, VUpload bypasses Excel and loads the data directly into Vision. In this example, a CompanyMaster file called comp.txt is located in the directory c:\datafiles. To load the text file, do the following:
1. Select Upload Data from the VUpload menu.
2. At the interface, select the class Entity from the Class list box.
3. Select CompanyMaster from the Feed list box.
4. Select the File button.
- You should see the Open dialog Box.
5. At the Look In text pull down box, find the directory datafiles for the file comp.txt, and select it.
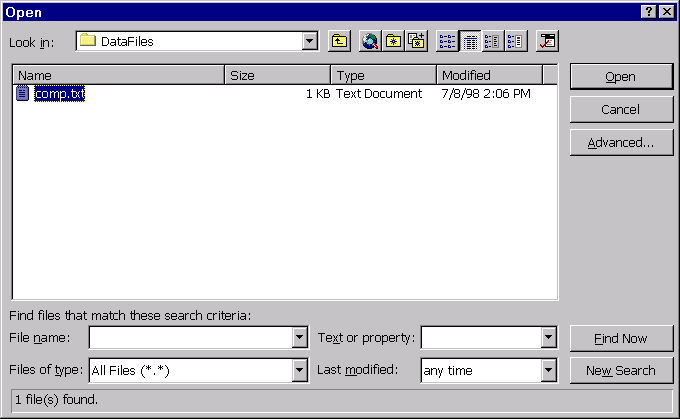
6. Select Open.
- When the file is loaded, you should see the Diagnostics dialog box.
7. Select OK.
Note: This only works with NT Servers.
Relationship to the Application Browser
To use Vision's web-based applications, there needs to be at least one Vision session running waiting for browser requests. These Vision sessions are known as listeners. Two types of listener can be started: master listeners and private listeners. The Vision Administrator can start one or more master listeners which are available and shared by all browser users. Analysts using the Excel add-ins automatically start a private listener which enables them to view private data via the standard browser applications.
When you start Excel and connect to Vision, a private listener is automatically started for you. When you make a Vision request via your web browser, it will be routed to this private listener. Any changes you make to the database via Excel will be reflected in any applications you run via the web browser. No one else will see your changes. When you exit Excel, these temporary modifications will disappear. If you wish to commit your changes to the database permanently, you will need to save them into one or more delimited text files and notify your administrator.
Creating New Entities, DataRecords, and Relationships
Creating New Entity Classes
Entity classes are used to organize instances that represent real-world entities or classifications. Entities are always created using a unique identifier. Each entity is normally assigned a name. The VUpload menu provides a choice for creating new Entity classes. For example, the process of creating a new entity class representing portfolio managers is described below:
1. Select Create Entity from the VUpload menu.
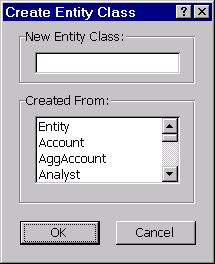
2. Enter Manager as the new entity type, and select Entity from the Created From List Box.
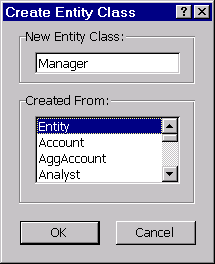
3. Select OK.
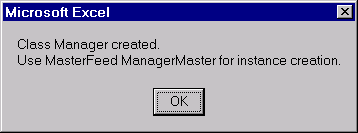
4. You should see confirmation that the Manager class has been created and that the ManagerMaster feed class has been created for uploading manager data.
5. Select OK.
You can now create new instances of Manager using the ManagerMaster feed in the Entity feed category.
Creating Instances For Entity feeds
To create instances for the new Manager feed, the minimal headings that are required are id and name. In this example, the instances Man1, Man2, and Man3 are defined.
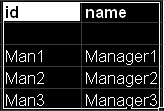
1. Select the range.
2. Select Upload Data from the menu.
3. Select Entity from the Category list box and ManagerMaster from the Feed list box.
-
Note that the ManagerMaster was added when you created the Manager entity.
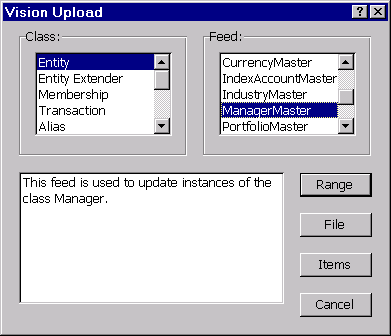
4. Select the Range button.
-
The diagnostics report should confirm that you have successfully loaded the data.
5. Select OK.
You have now successfully created 3 instances of the class Manager.
Creating New DataRecord Classes
DataRecord classes are used to manage sets of related information about a specific entity. These classes provide a way to organize data about an entity into manageable substructures. For example, PriceRecord is used to track pricing information such as high, low, and closing price for a security. DataRecord instances are normally accessed via a property defined at the Entity instance with which it is associated.
The VUpload menu provides a choice for creating new DataRecord classes and associating them with an Entity class. For example, you can create the class ModelData to track several model scores about a company over time using the following procedure:
1. Select Create DataRecord from the VUpload menu.
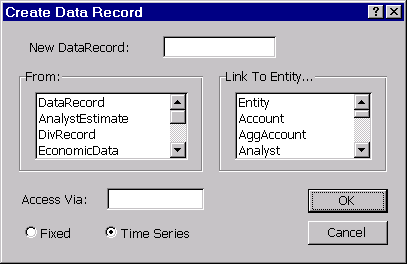
2. Enter ModelData as the new DataRecord type, select DataRecord from the From List Box, select Company from the Link To Entity... list box, and enter modelData in the access via: text box. Select Time Series to indicate that the model data varies over time.
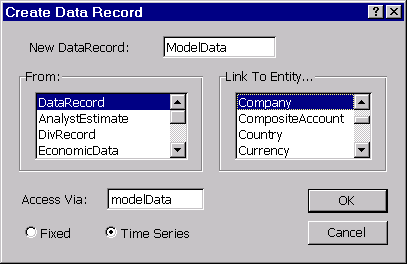
3. Select OK to define the ModelData class and its link to Company.

4. You should see confirmation that the ModelData class has been define and linked to the Company class via the modelData path. The ModelDataFeed has been created for uploading model data for a company over time.
5. Select OK.
You have now created the feed name ModelDataFeed, which is found in the Entity Extender feed category.
Creating Properties for a DataRecord
Before you can create instances for a DataRecord, you must define properties for it. A property is a message that is defined for a specific class. When defining a property, you use the feed name PropertySetup. In this example, ModelData defines properties for the model scores, model1, model2, and model3. Select the range and upload it.
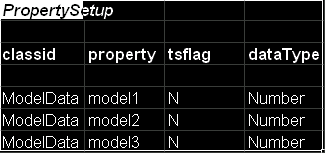
You will receive notification that the properties for DataRecord have been established. You can now create new instances of ModelData using the ModeDataFeed feed in the Entity Extender feed category.
Creating DataRecord Instances for Companies Over Time
In this example, you are tracking model scores for several companies for several dates:
1. Select the Range
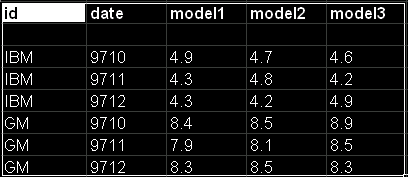
2. Select Upload Data from the menu.
3. Select the category Entity Extender, and the feed ModelDataFeed.
-
Note that the ModelDataFeed choice was added when you created the ModelDataRecord.
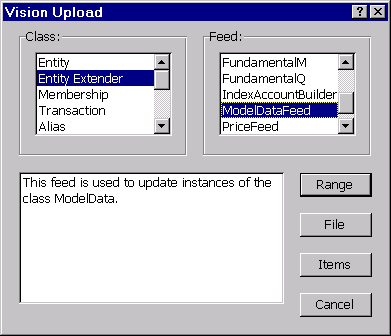
4. Select Range.
The diagnostic report should confirm that you have successfully loaded the data. See The Data Extraction Module for a sample of how to extract this data.
Creating A Relationship
Relationship are used to define MembershipFeeds for uploading one-to-many relationships such as company-to-industry over time. For example, every portfolio is managed by a single manager at a given point in time and a manager manages zero, one, or many portfolios at a given point in time. You can create a relationship to track this using the following procedure:
1. Select Create Relationship from the VUpload menu.
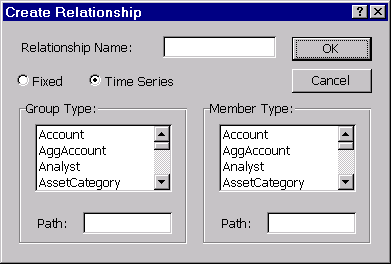
2. Enter PortToManager as the new relationship, select Manager from the Group Type list box, and Portfolio from the Member Type: list box. You need to define the access path from Portfolio to Manager and from Manager to Portfolio. Since each manager tracks a list of portfolios, enter portfolioList for the GroupType path. Since each portfolio is managed by a single manager at a given point in time, enter manager for the MemberType path. Select Time Series to indicate that the relationship will change over time.
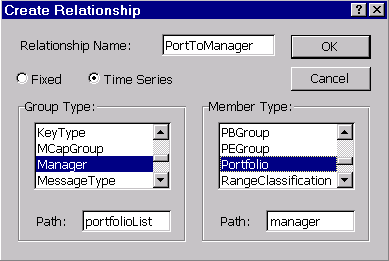
3. Select OK to submit these definitions.
4. You should see confirmation that the PortToManager feed has been created for membership updates.
5 Select OK.
You can now create new instances of PortToManager in the Relationship feed category.
Creating Instances For Relationships
To create relationships, you must have data for memberId and a groupId. In this example, the members are instances of Portfolio and the groups are instances of Manager.
Note: You need to define instances for PortolioMaster to do this example.
1. Select The Range.
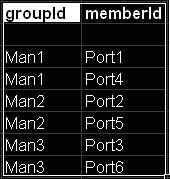
2. Select Upload.
3. Select the category Relationship and the feed PortToManager.
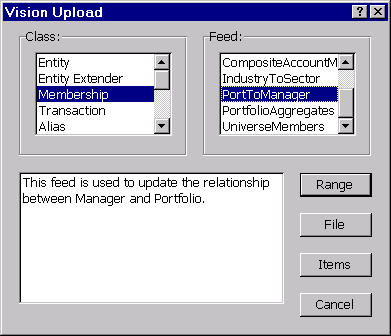
The diagnostics message box should indicate that you have created the instances that make this relationship correspond to each other.
The Data Extraction Module
The Extract add-in defines tools to download Vision data directly into your spreadsheet. You can access specific data values as part of formulas in a cell. Alternatively, you can extract tables of information in a number of formats. This add-in is described in detail in the document Sample Excel Access to Vision.
The following is an example of an Entity By Item Extraction. The companies are entered as rows, IBM and GM, tracking the items entered as columns, modelRecord model1 and modelRecord model2. To complete the extraction, do the following:
1. Select The Range

2. Select Set Defaults from the Vision menu.
3. Enter Company as the Entity Type.
4. Select Get Entity By Item Data from the Vision menu.
Your Extraction is complete.